


Sudoku Techniques: From Singles to Swordfish
Practice each technique at its level
This guide covers every technique our puzzles are built on, in the order a solver should try them. Each diagram is a real position from one of our puzzles, found automatically by the same logic engine that grades the levels. Row and column numbers run along the edges, so r5c2 means row 5, column 2. Small digits are candidates (notes); circled digits form the pattern; struck-out red digits are the candidates the technique removes.
| Technique | Level that first needs it |
|---|---|
| Hidden single, naked single | Easy |
| Naked pair, hidden pair, pointing, claiming | Medium |
| Naked triple, hidden triple, X-Wing | Hard |
| XY-Wing, Swordfish, simple coloring | Expert |
1. Singles: the hidden single and the naked single
Singles place digits directly, and they do most of the work in every Sudoku, at every level. There are two kinds, and it helps to look for them in this order.
Hidden single
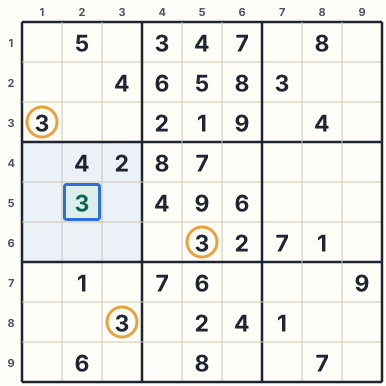
A hidden single is a digit that has only one possible home in a row, column or box. In the diagram, box 4 still needs a 3. The 3 in r3c1 rules out column 1, the 3 in r8c3 rules out column 3, and the 3 in r6c5 rules out row 6. The only cell left is r5c2, so the 3 goes there, even though that cell might allow other digits too.
To find hidden singles, take one digit at a time and cross-hatch: for each box that lacks the digit, mark the rows and columns that already contain it. This is the fastest technique to run in your head, and it is the one beginners should practice first.
Naked single
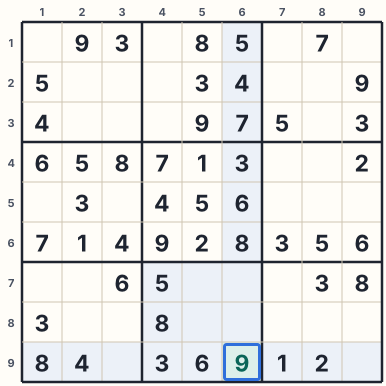
A naked single is a cell with only one candidate left. In the diagram, r9c6 can see 1, 2, 3, 4, 5, 6, 7 and 8 somewhere in row 9, column 6 or box 8. Only 9 remains. Naked singles are easiest to spot late in a puzzle or once you keep notes, because then a cell with one note stands out at once.
2. Pairs: naked pair and hidden pair
Pairs do not place digits; they remove candidates so that new singles appear. They are the first step of every medium puzzle.
Naked pair
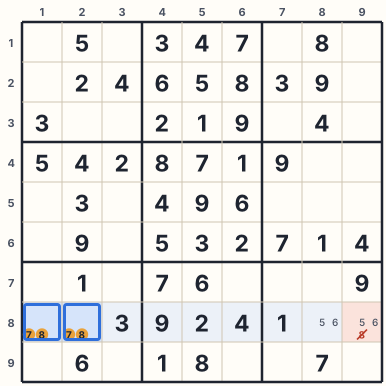
When two cells in the same unit hold exactly the same two candidates, those two digits must go into those two cells, in one order or the other. In row 8, r8c1 and r8c2 can each be only 7 or 8. No other cell of row 8 can therefore be 7 or 8, and the 8 in r8c9 is crossed out.
Hidden pair
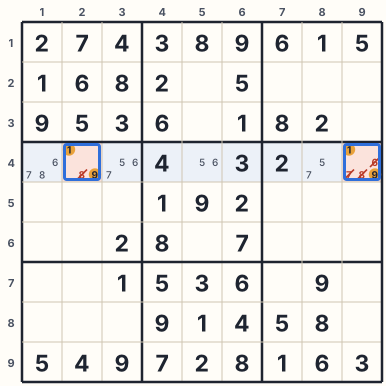
A hidden pair is the same idea seen from the digits' side. In row 4, the 1 and the 9 each have only two possible cells, and they are the same two cells: r4c2 and r4c9. Those cells are reserved for 1 and 9, so every other candidate in them can go: the 8 in r4c2 and the 6, 7 and 8 in r4c9. Hidden pairs are harder to see than naked ones because the extra notes disguise them.
3. Pointing and claiming (box/line interactions)
These two techniques use the overlap between a box and a row or column. They often need only one digit's notes, which makes them quick to check.
Pointing
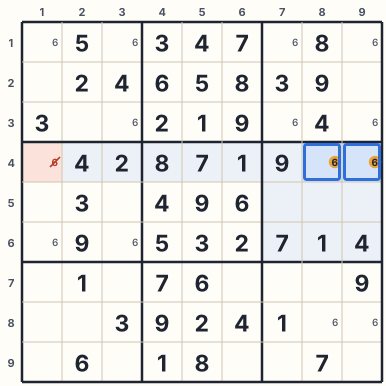
In box 6, the 6 can only go in r4c8 or r4c9. Both are in row 4, so whichever is right, the 6 of row 4 lives inside box 6. The candidate 6 in r4c1, further along the same row, is impossible. The box 'points' along the row.
Claiming
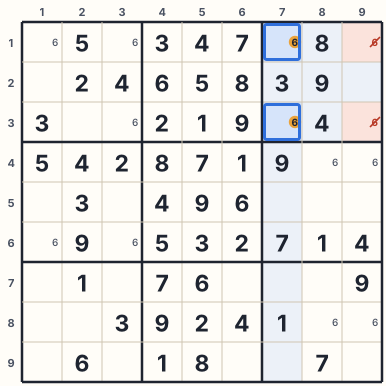
Claiming works the other way round. In column 7, the only places for 6 are r1c7 and r3c7, and both lie in box 3. The column therefore claims the 6 of that box, and the other 6s in box 3, at r1c9 and r3c9, are removed. Some books call this a box/line reduction.
4. Triples: naked triple and hidden triple
Triples extend pairs to three cells and three digits. They are the first of the hard-level techniques.
Naked triple
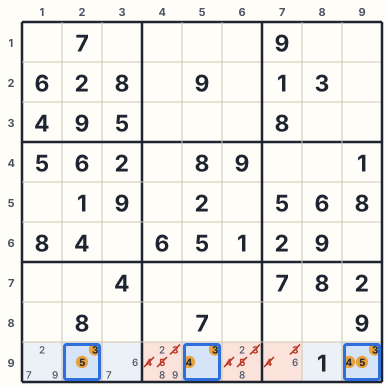
Three cells in one unit whose candidates, taken together, are only three digits form a naked triple. The cells do not need to show all three digits each. In row 9, r9c2 allows 3 or 5, r9c5 allows 3 or 4, and r9c9 allows 3, 4 or 5. Between them they must use up 3, 4 and 5, so those digits are removed from the other cells of the row: r9c4, r9c6 and r9c7.
Hidden triple
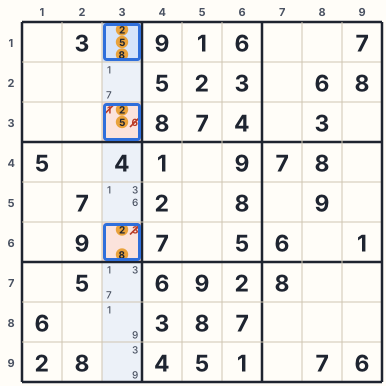
In column 3, the digits 2, 5 and 8 can only go in three cells: r1c3, r3c3 and r6c3. Those cells must hold those digits, so their other candidates are removed: 1 and 6 from r3c3, and 3 from r6c3. Hidden triples are among the rarest patterns in our puzzles, and the hint button is a good way to learn what they look like.
5. X-Wing
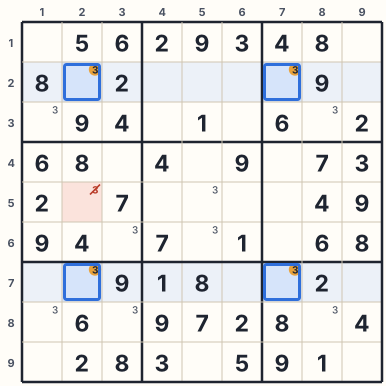
The X-Wing follows one digit across two rows. In row 2, the 3 can only go in column 2 or column 7. In row 7, exactly the same is true. The four cells form a rectangle, and the two 3s must sit on opposite corners: either r2c2 and r7c7, or r2c7 and r7c2. In both cases, columns 2 and 7 each get their 3 from rows 2 and 7, so the 3 can be removed from every other cell of those columns, here from r5c2.
The pattern also works with rows and columns swapped. To hunt for it, pick a digit and list the rows where it has exactly two candidates; any two of those rows that use the same two columns make an X-Wing.
6. XY-Wing
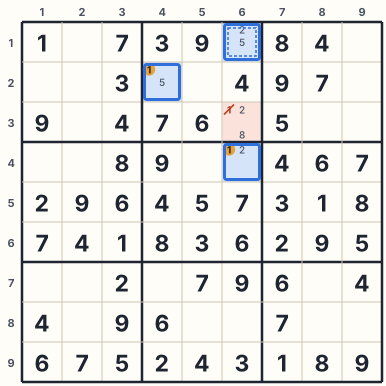
The XY-Wing uses three cells with two candidates each. The pivot, r1c6, can be 2 or 5. It sees two wings: r2c4 with 1 or 5, and r4c6 with 1 or 2. If the pivot is 5, r2c4 must be 1; if the pivot is 2, r4c6 must be 1. Either way, one of the wings is 1. Any cell that sees both wings therefore cannot be 1. Here that is r3c6, which shares box 2 with r2c4 and column 6 with r4c6.
Look for XY-Wings by starting from cells with exactly two notes. They are common in expert puzzles and often unlock the rest of the grid.
7. Swordfish
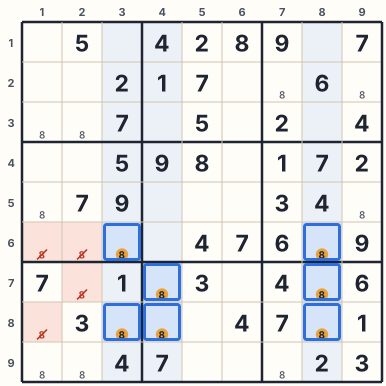
A Swordfish is an X-Wing with three lines instead of two. In this position, the 8 has two or three possible cells in each of columns 3, 4 and 8, and all of them lie in rows 6, 7 and 8. Those three columns need three 8s, and they can only take them from those three rows. So the 8s of rows 6, 7 and 8 are used up by columns 3, 4 and 8, and the 8 can be removed from the other cells of those rows: r6c1, r6c2, r7c2 and r8c1.
Not every line needs three candidates; two in some lines is fine, as long as the union covers exactly three lines in the other direction.
8. Simple coloring
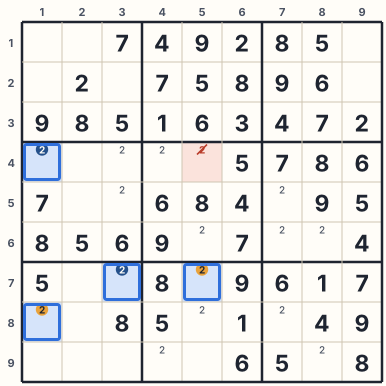
Simple coloring follows one digit through a chain of strong links. A strong link joins the only two cells in a unit that can hold the digit: exactly one of them is true. Here the 2 has strong links r4c1–r8c1 (column 1), r8c1–r7c3 (box 7) and r7c3–r7c5 (row 7). Color the chain alternately: r4c1 and r7c3 blue, r8c1 and r7c5 amber. Either every blue cell is 2 or every amber cell is.
Now look at r4c5. It sees the blue r4c1 along row 4 and the amber r7c5 down column 5. Whichever color is true, r4c5 sees a 2, so its candidate 2 is removed. This is the color trap. The second rule, the color wrap, applies when two cells of the same color see each other: that color must be false everywhere.
How to practice
- Play the level that matches the technique you are learning: medium for pairs and pointing, hard for triples and X-Wing, expert for the rest.
- When you are stuck, take one hint and read the technique name in the message, then look for the same pattern elsewhere.
- Use the fill-in-all-candidates button to skip the clerical work while you train your eye for patterns.